How You Blow Dry Hair for Volume That Actually Stays (Even on Fine Hair)
This post may contain affiliate links, which means I'll receive a commission if you purchase through the link at no extra cost to you. Please read the full disclosure here.
TL;DR
To blow-dry hair for volume that actually lasts, focus on a root-first method using lightweight products, proper sectioning, and a cool-air setting. Skip the upside-down hack. The pro technique shared below delivers lift, bounce, and shine from start to finish.
Why Your Blowouts Keep Falling Flat (And What to Do Instead)
You know that feeling when you spend 30 minutes blow-drying your hair, only for it to fall flat by the time you’ve made your second coffee. The roots are limp, the ends look frizzy, and that salon-style lift you were hoping for? Nowhere in sight.
As a hairstylist with over 10 years behind the chair, I’ve seen this happen with all hair types, especially fine or medium textures. The problem? Most tutorials and TikTok tricks skip the foundational steps that make volume last.
In this post, I’m walking you through exactly how to blow-dry hair for volume using the same techniques I teach clients in the salon. We’re talking root-first styling, proper sectioning, using heat intentionally (not randomly), and the underrated power of a cool shot. Whether your hair is short, fine, or you’re working without a round brush, I’ve got you.
Let’s dive in.
Gift better hair days this season.
From top hair tools under $150 to budget sets under $100, the Haiirology Holiday Hub has picks for every style, budget, and hair concern.
Explore the Holiday HubGather Your Tools & Products for Blow-Drying Hair for Volume
Your blowout is only as good as your prep tools. You don’t need a drawer full of gadgets, but a few strategic picks make all the difference between flat and full.
Here’s what I personally reach for when I’m blow-drying for volume whether on clients or myself:
| Product/Tool | Why I Recommend It | Buy Here |
|---|---|---|
| Volumizing Mousse or Root Lifter | Look for something lightweight but strong enough to hold. I usually reach for mousse on fine or limp hair because it expands the hair shaft without adding weight. You’ve got to apply it directly to the roots, not just through the ends, to really build volume from the base. | Buy Mousse Here for $31 |
| Heat Protectant Spray | This is non-negotiable. It not only shields your hair from heat damage, but it also helps seal the cuticle so your blow-dry holds shape longer and looks shinier. | Buy Heat Protectant Here for $32 |
| Round Brush | A ceramic or boar-bristle round brush is my go-to for creating bounce and root lift. Use a smaller barrel for short hair, larger for long layers. This is where the real shaping happens. | Buy Round Brush Here for $32.95 |
| Paddle Brush | Perfect for those who want a smoother, straighter finish without the round brush technique. It won’t give you as much root lift, but it’s great for control and shine. | Buy Paddle Brush Here for $34.95 |
| Sectioning Clips | These make your blow-dry 10x easier. Neat sections mean more precision, more control, and ultimately more volume where you want it. | Buy Sectioning Clips Here for $7.99 |
| Blow Dryer with Nozzle + Cool Shot | A nozzle directs heat right at the roots where you need it most. The cool shot button is your secret weapon as it seals the style in place and makes your volume last longer. | Buy Blow Dryer Here for $349 |
| Velcro Hair Rollers | These are my go-to for setting volume after a blow-dry, especially at the crown. Pop them in while your hair is still warm, let them cool fully, and you’ll get instant lift without extra heat. | Buy Hair Rollers Here for $11.18 |
How to Prepare Your Hair Properly for Volume Before Blow-Drying
Source: Personal Image
Before you even touch your blow dryer, let’s set your hair up for success. I can’t stress this enough: your prep stage is where 80% of the volume magic happens. Most people rush this part but if you take a few extra minutes here, your hair will thank you.
Start with Damp, Not Dripping Hair
After washing, gently blot your hair with a microfiber towel or soft t-shirt. Avoid rubbing as it roughs up the cuticle and creates frizz.
You want your hair to be about 70-80% dry before you start styling.
This rough-dry stage helps reduce heat damage and gives your roots a natural lift before you even bring in a brush.
Apply Product Strategically
Work your volumizing mousse or root spray in at the roots while hair is still damp, not soaking wet.
Comb through gently with a wide-tooth comb or detangling brush to distribute evenly.
If your hair is super fine or tends to fall flat, apply extra product at the crown and front hairline as those are the first areas to deflate.
Detangle and Section for Maximum Control
Use your fingers or a detangling brush to gently smooth out any knots.
Then, section your hair into 4–6 parts:
Top/front
Crown
Sides
Back/nape
Use clips to keep them separated. This gives you control, ensures even drying, and lets you really focus on root lift and not just blasting heat all over the place.
Use a Zig-Zag Part (Trust Me on This One)
A straight part tends to split and flatten out the style as the day goes on.
A zig-zag part adds subtle lift and texture, even before you style. It’s one of those tiny things that makes a big difference.
Want more blow out tips?
FREE DOWNLOAD
THE ULTIMATE AT-HOME BLOWOUT STARTER KIT

FREE 14-page guide all about my favourite tools & products for getting the best at-home blowout!
- ✅ Learn the tools & products that make the biggest difference
- ✅ Discover the essentials for achieving a smooth, long-lasting blowout
- ✅ Start mastering the go-to style that everyone wants
- ✅ Become the inspo photo your friends show their hairstylist!
No spam — just great hair advice!
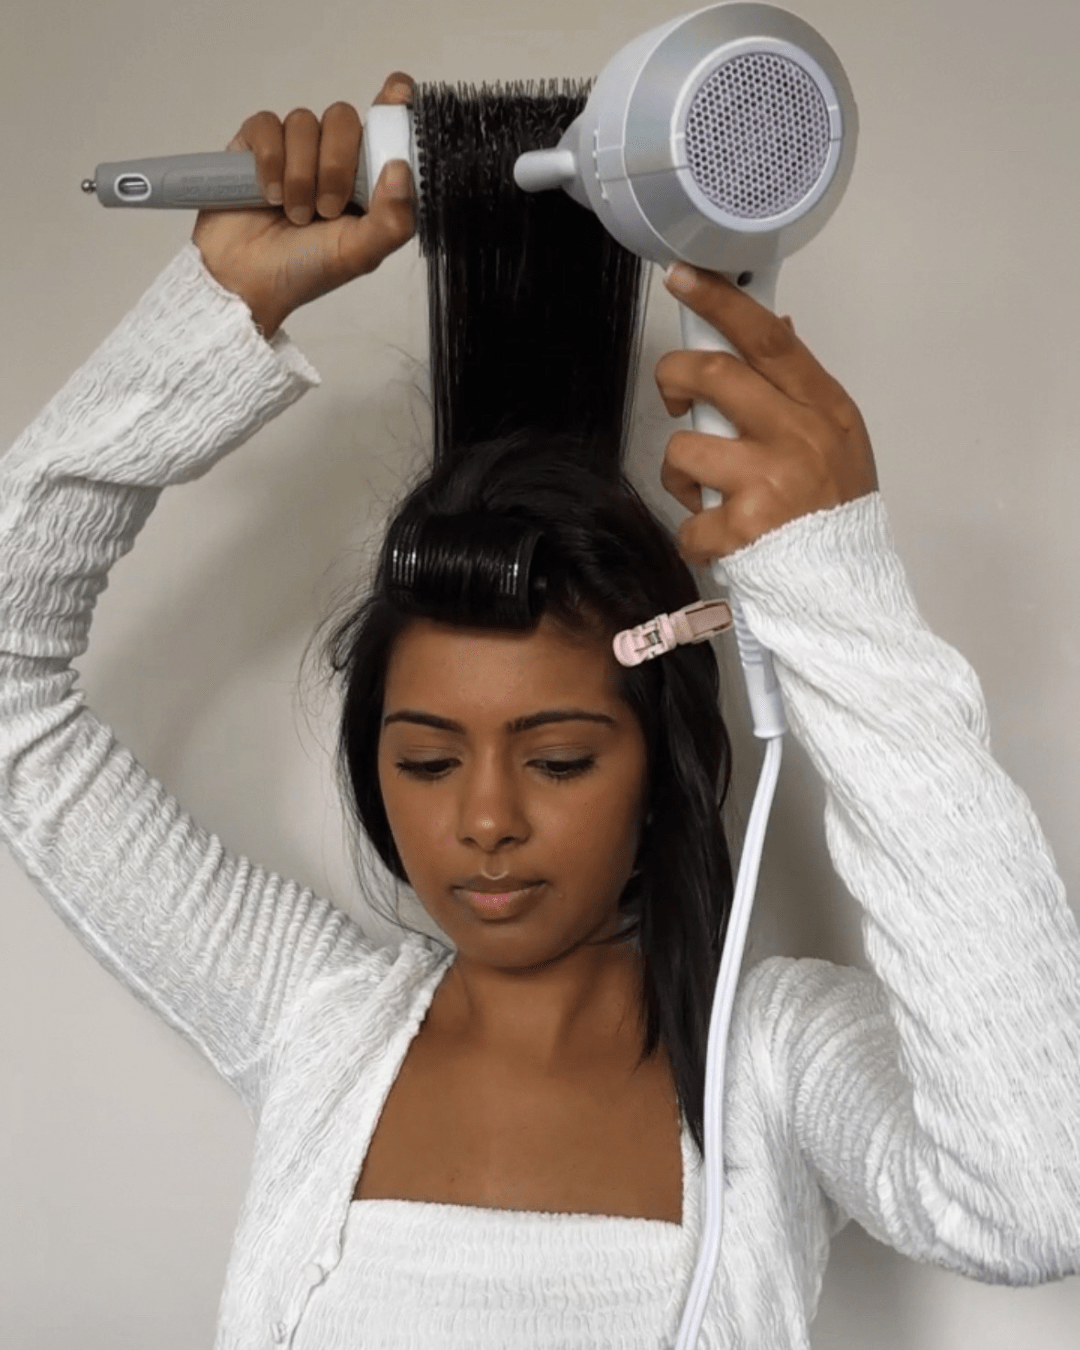
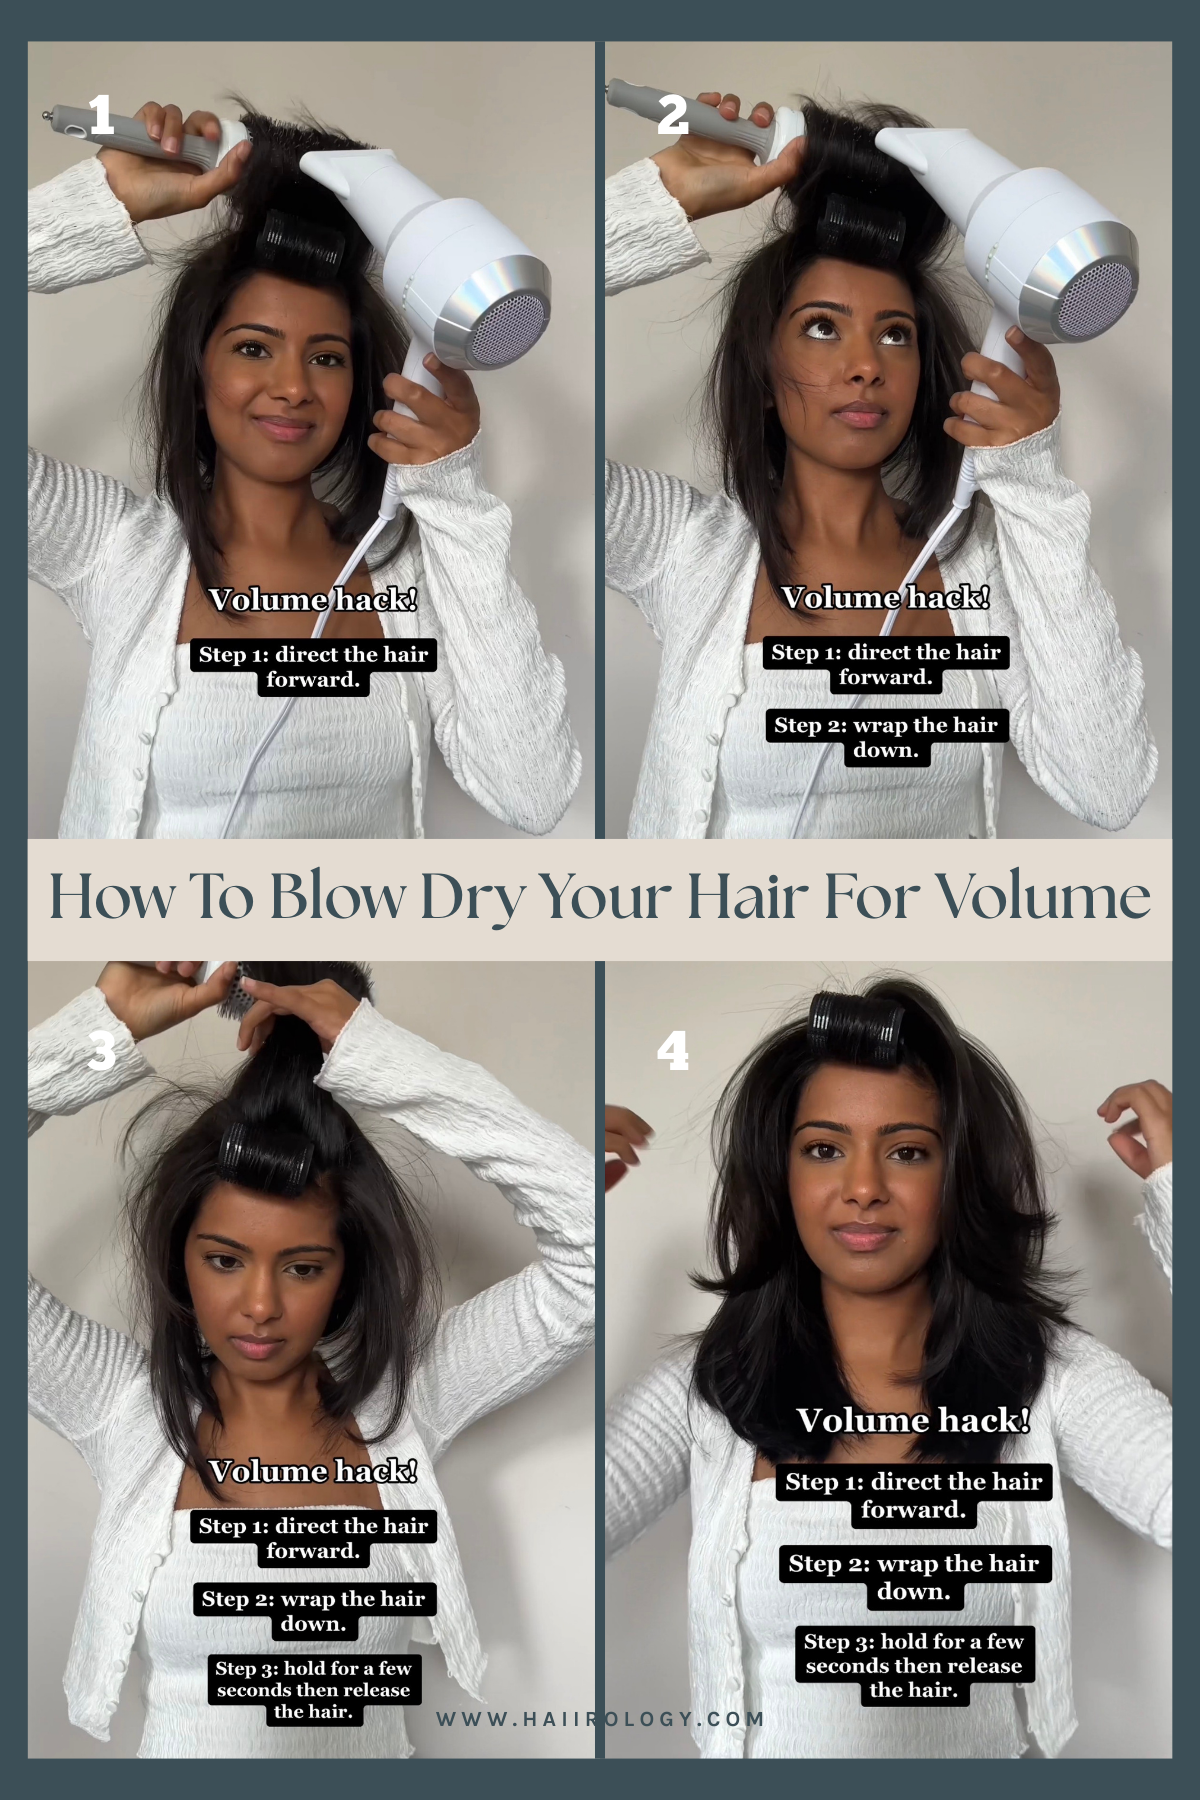
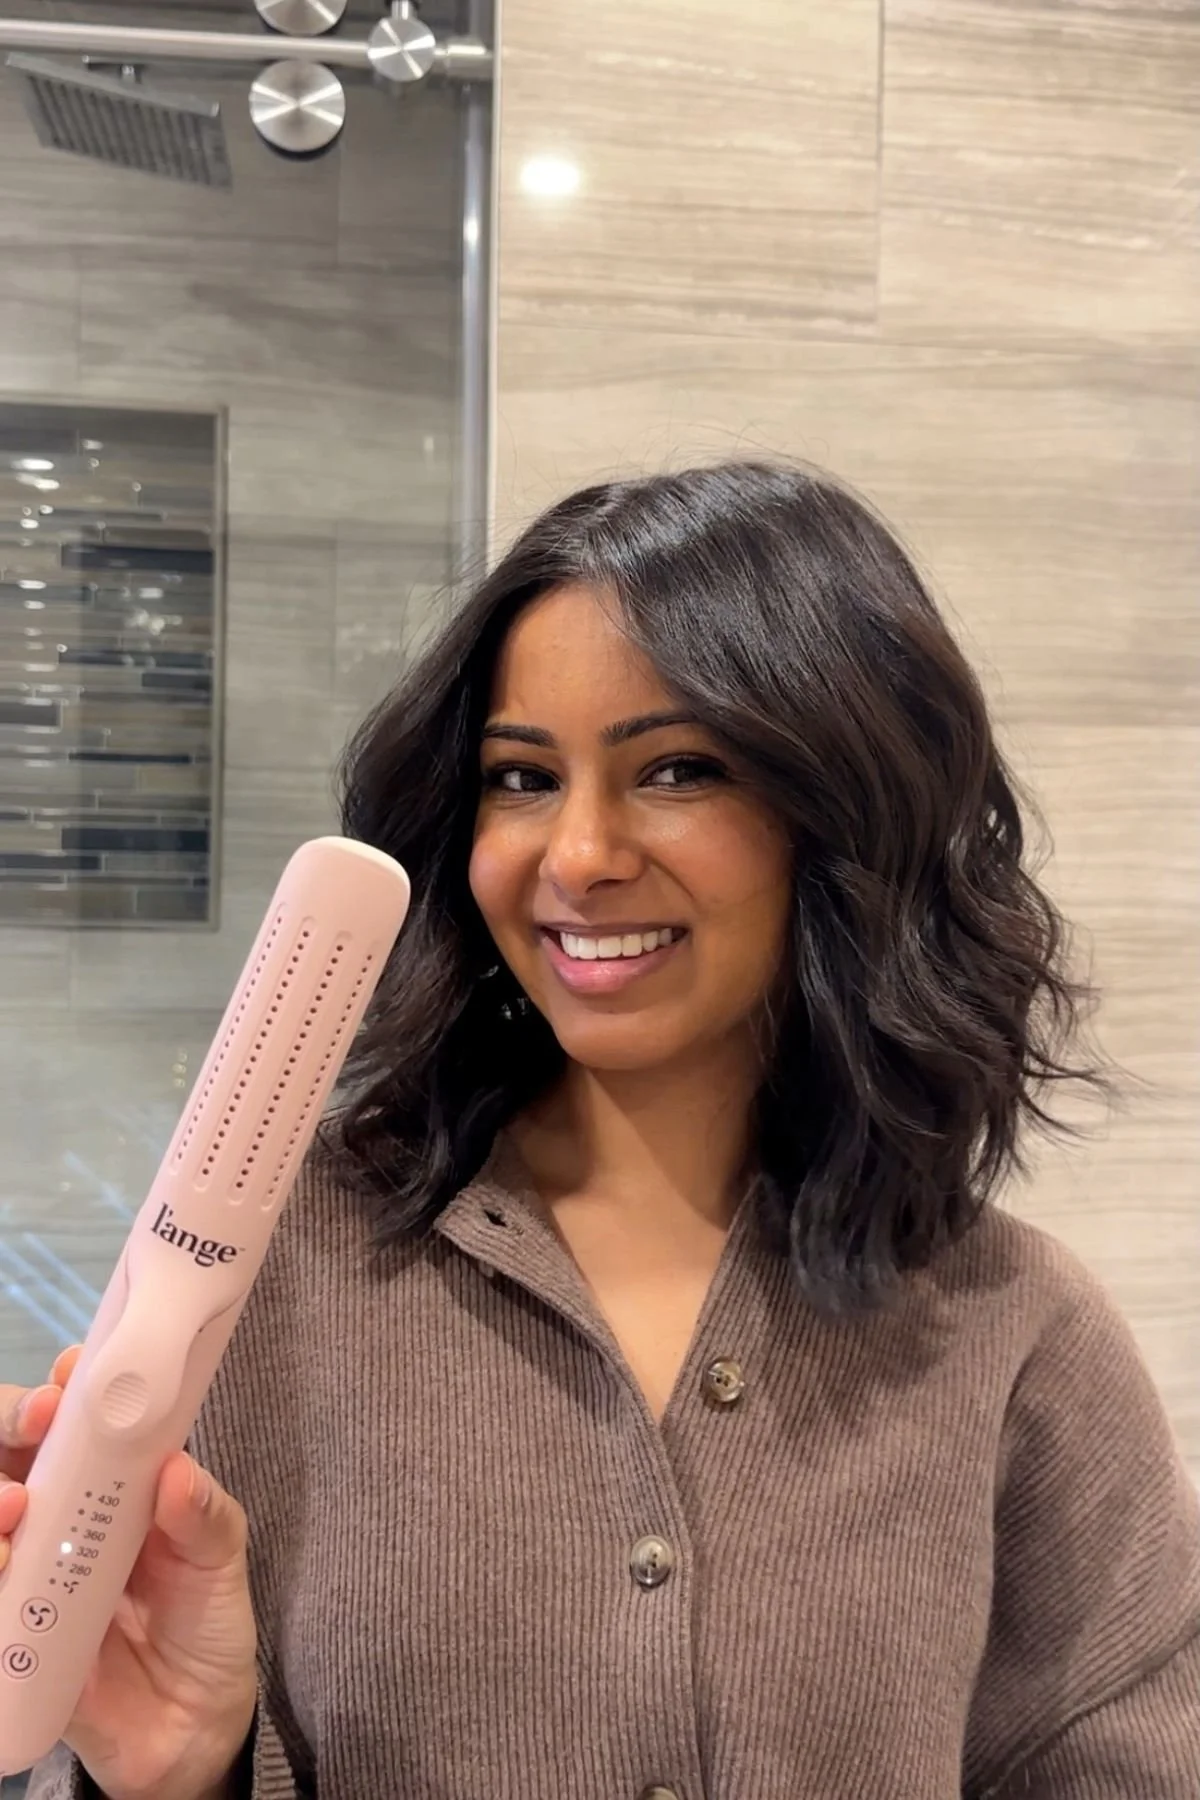
Use the Round Brush Method to Blow Dry Hair for Volume
Source: Personal Image
This is my go-to technique in the salon when a client wants bounce, movement, and volume that actually lasts beyond lunchtime. If you’ve struggled with limp roots or styles that fall flat after an hour, chances are you’ve been skipping one of the steps below.
Let me break it down like I would for a client in my chair.
Who It’s For
- ▪ Medium to long hair
- ▪ Straight to wavy textures
- ▪ Clients who want smooth, lifted styles without needing hot rollers or curlers afterward
Why It Works
- ▪ Round brushing combines tension + heat + directional airflow to mould the hair into shape while sealing the cuticle.
- ▪ That combo gives shine, bounce, and lift that doesn’t fall flat in two hours.
- ▪ Add a cool shot at the end? Chef’s kiss.
Step-by-Step Process
Start with the crown
This is where most people need the most lift. Always begin here before the rest of your hair dries and weighs itself down.Take small sections (1–2 inches wide)
The smaller the section, the more control and volume you get. Use clips to work section by section.Lift hair up and out
Wrap the section around the round brush and lift it straight up (or at least 90 degrees from your scalp). This is key to creating lift at the root.Direct the airflow downward
Always aim the nozzle down the hair shaft to smooth and seal the cuticle. This gives you volume plus shine.Use the cool shot before releasing the brush
Once the section is fully dry and warm, hit it with the cold shot button for 5–10 seconds before unrolling. This sets the shape and helps it hold longer.Clip the section to cool if needed
For extra staying power, roll the section back up and clip it in place while it cools. Unclip once you’re finished with all the sections.
Pro Tips
- Use a smaller round brush on short hair to get closer to the root.
- Apply a volumizing root spray under each section if you need more structure (especially helpful for fine or thinning hair).
- Avoid flipping your head upside down to “boost volume” as it roughs up the cuticle and creates frizz without real root lift.
👉 Not sure which round brush size is right for you? Check out my guide on Round Brush Size Guide for the perfect match!
| Blowout Styles, Tools & Comparisons |
|---|
| Whether you’re perfecting a salon-style blowout, learning with new tools, or comparing techniques, these posts will guide you step by step: Explore these guides to achieve sleek, voluminous results while learning which method works best for your hair. |
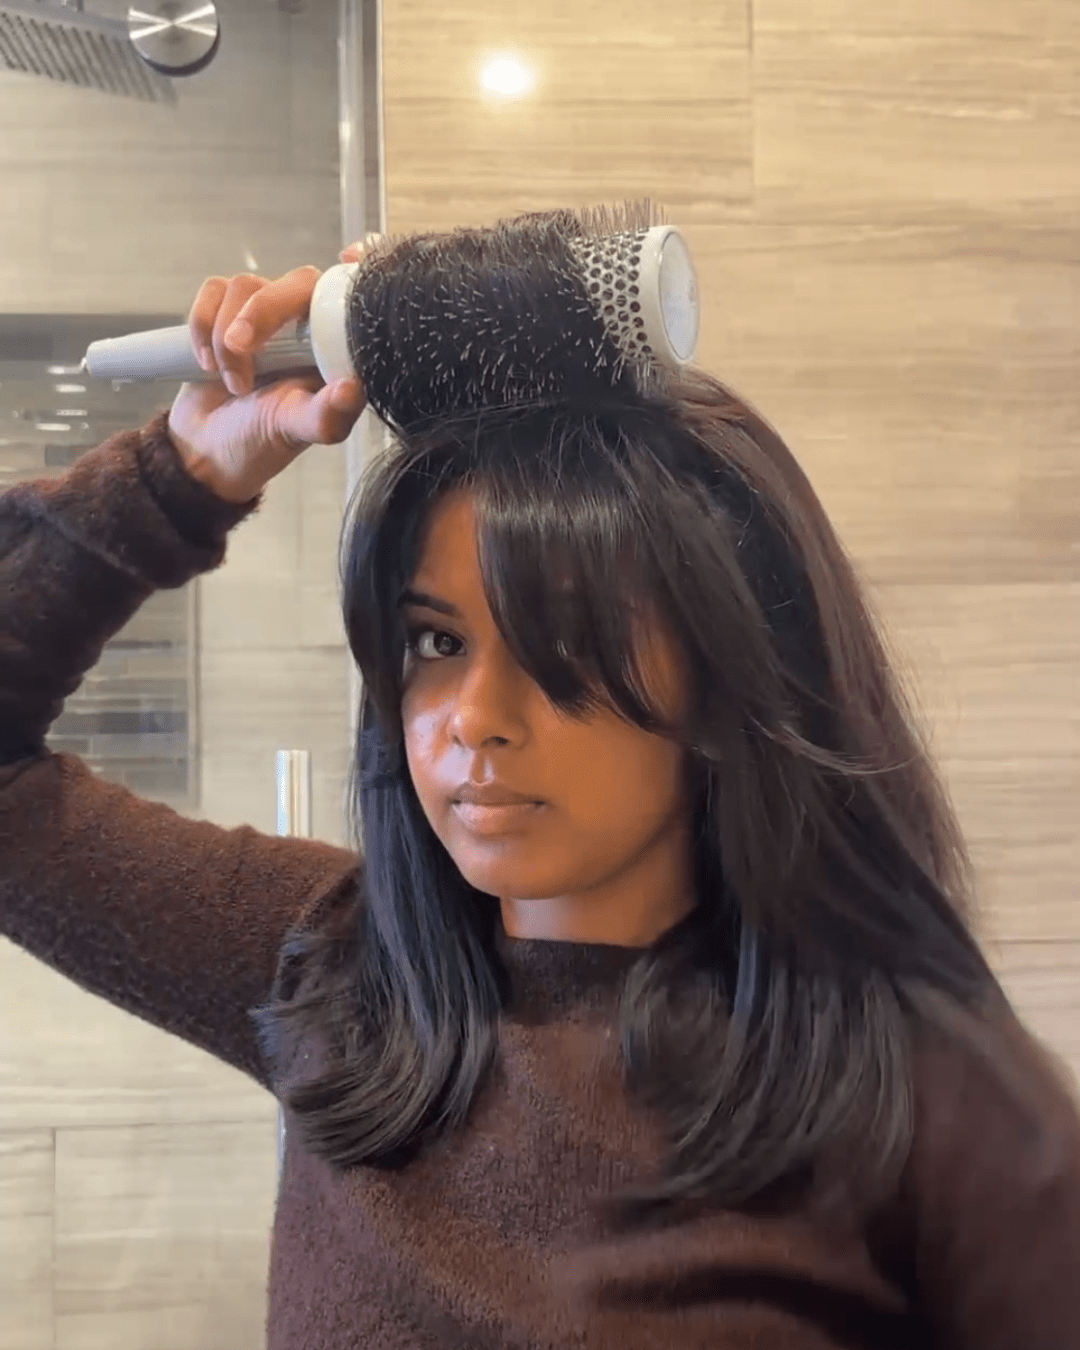
Try the “No Round Brush” Technique for Blow-Drying Hair for Volume

Source: Personal Image
Not everyone loves using a round brush and that’s okay. Whether you’re short on time, tools, or just coordination (hey, we’ve all been there), this no-brush method still gives you visible lift and bounce. I use this technique often with clients who have shorter hair or want a lower-effort routine at home.
Who It’s For
- ▪ Shorter hair lengths (bob, lob, pixie)
- ▪ Anyone new to blow-drying
- ▪ People with wrist or shoulder issues who find round brushing tiring
- ▪ A quick, everyday approach for busy mornings
Why It Works
- ▪ You’re still using heat and airflow direction to lift the roots, just replacing the brush with your fingers and smart parting.
- ▪ It’s more forgiving and easier to master, but still gives lift where it matters.
Step-by-Step Process
Apply volumizing mousse at the roots while damp
Focus on the crown and front hairline. These are the first areas to deflate throughout the day.Blow dry using your fingers to lift at the roots
Use your fingers like a claw: gently lift the hair and guide the airflow underneath, working section by section from the crown forward.Switch part lines mid-way
Halfway through drying, flip your part to the opposite side (even temporarily). It breaks up “part fatigue” and gives instant volume when flipped back.Use the cold shot to set the shape
Once the roots are dry and lifted, blast them with cool air to hold that lift in place.
Pro Tips
- Start at the crown, not the front. This prevents the top of your head from flattening as you work.
- Once your hair is dry, pop velcro rollers at the crown for 10-15 minutes to bump up volume even more (no heat needed).
- Don’t over-dry the ends, instead let them stay slightly soft to avoid frizz and maintain movement.
Fix Common Blow-Dry Mistakes That Kill Volume
| Mistake | Why It Happens | How to Fix It |
|---|---|---|
| Skipping Root Styling | Most people jump straight into drying the ends, ignoring the base. | Always start at the roots and crown, using product and heat to build structure before styling the lengths. |
| Using Too Much Product | Overloading mousse or sprays can weigh down fine or medium hair. | Use a golf ball-sized amount, focused on the roots. Distribute with hands or a comb, less is more. |
| Grabbing the Wrong Brush | Flat brushes smooth the hair but don’t add lift at the root. | Choose a round brush for volume. Or try the no-brush technique if that feels more comfortable. |
| Skipping the Cool Shot | The section looks done after drying, so people move on too fast. | Lock in volume by hitting each section with a blast of cold air before releasing it. It seals the shape. |
FAQs: Blow-Drying Thin Hair for Volume
How do I blow-dry thin hair for volume?
Use lightweight, root-lifting products (like mousse) and avoid heavy oils or serums near the scalp. Blow dry in small sections, lifting each one straight up with a round brush or your fingers. Always finish with a cold shot to set the shape.
Pro tip: Zig-zag your part for extra fullness as it tricks the eye and adds dimension at the roots.
Can I blow-dry for volume without a round brush?
Yes! Use your fingers to lift the hair at the root while blow-drying and direct the airflow underneath each section. This gives you natural lift without needing brush control. Velcro rollers after drying can also help boost crown volume.
How do I get volume at the roots?
It’s all about air direction and tension. Lift hair up and away from the scalp while directing heat at the root area. Use volumizing mousse before drying and a cool shot to lock everything in place. Skipping the root focus is the number one reason blowouts fall flat.
What do I put in my hair before blow-drying for volume?
Volumizing mousse for structure
Heat protectant spray to shield hair from damage
Optional: Volume spray for fine hair that needs extra grit at the roots
Apply products to damp, not soaking, hair for best absorption and styling control.
Will this work on short or medium hair?
Absolutely. The key is using a smaller round brush or the no-brush finger technique if your hair is chin-length or shorter. Volume is not about length, it is about how you lift, dry, and set the root area.
Track Your Progress & Adjust for Better Volume Over Time
Getting salon-worthy volume at home doesn’t always happen on the first try. And that’s okay. The key to improving your blow-dry technique is paying attention to what actually worked (and what didn’t).
Here’s how I tell my clients to track their progress:
Create a Simple Styling Journal
You don’t need a fancy spreadsheet. Just a few quick notes after each blow-dry session can help you level up fast.
Below's an example, you can SREENSHOT!
| Date | Tools/Products Used | Method | What Worked Well | What to Tweak Next Time |
|---|---|---|---|---|
| 9/21 | Round brush, mousse, dryer with nozzle | Round brush method | Great root lift, smooth ends | Try smaller sections at the crown |
| 9/24 | Mousse, no brush, fingers only | No-brush method | Faster finish time | Crown didn’t stay lifted all day, add Velcro rollers |
Screenshot or Record Your Results
Snap a selfie after blow-drying so you can compare results over time.
If you try a new brush or change your parting, take note of it.
Save product combos that actually gave you bounce without frizz.
What to Adjust for Next Time
Did your roots fall flat by noon? Try starting at the crown next time.
Does hair feel crunchy? You might be using too much mousse.
Struggling to hold volume overnight? Add a few Velcro rollers at bedtime or clip your hair into a loose topknot.
My Extra Stylist-Backed Tips for Lasting Volume After Blow Drying
You’ve done the blow-dry, you’ve got the lift but how do you make it stay? The truth is, what you do after styling matters just as much as the blowout itself. These are the same pro tips I give clients who want their volume to last from morning to night (and even into the next day).
Use Dry Shampoo Before You Think You Need It
Don’t wait until your roots feel oily. Spritz a little dry shampoo at the crown and part line around mid-day even on clean hair. It adds subtle texture, so your lift doesn’t collapse.
Clip Your Hair Up Loosely Overnight
Sleeping on your freshly styled hair can flatten it fast. Instead:
Use a few Velcro rollers at the crown
Or twist your hair into a loose topknot on top of your head
Secure with a silk scrunchie or claw clip to prevent creases
You’ll wake up with more bounce and way less bedhead.
Avoid Heavy Oils Near the Roots
Oils and serums are great for ends but not for volume. Applying anything heavy too close to the root will weigh your hair down and undo all your work.
Refresh With a Cool-Air Reblast
On day two or three, you don’t need to rewash, just lightly mist your roots with water, lift them, and blast with your dryer’s cool shot for 10-15 seconds. It’s a fast way to revive volume without starting from scratch.
FREE DOWNLOAD
THE ULTIMATE AT-HOME BLOWOUT STARTER KIT
FREE 14-page guide all about my favourite tools & products for getting the best at-home blowout!
- ✅ Learn the tools & products that make the biggest difference
- ✅ Discover the essentials for achieving a smooth, long-lasting blowout
- ✅ Start mastering the go-to style that everyone wants
- ✅ Become the inspo photo your friends show their hairstylist!
No spam — just great hair advice!
Want more product recs from Jen?

Now that you know how to blow dry your hair for volume, the real question is: do you know how to keep your hair healthy at home with all that heat?
If not, don’t worry! I’ve got you. As a hairstylist of 10+ years (and a product junkie who’s tried it all), I’ve rounded up my top hair tools, styling picks, and everyday must-haves in one easy-to-shop page. P.S. I even snuck in a few of my beauty + outfit faves!
Explore Jen’s FavoritesFinal Word From Haiirology
If there’s one thing I hope you take away from this post, it’s this: volume isn’t about luck, it’s about intention. With the right tools, root-first strategy, and a bit of technique, you can absolutely create salon-level bounce at home.
Whether you’re working with a round brush or just your hands, the formula stays the same:
Prep well. Lift at the roots. Finish with a cold shot. Don’t skip the little things.
These are the exact tips I give my clients in the salon chair and now they’re yours too.
Did this guide help you? Drop your questions in the comments or DM me anytime, I love hearing how your styling game is levelling up.
And if you try this at home, tag me on Instagram @HaiirologyByJen—I’d love to see your before-and-afters!


How to curl your hair with a curling iron: step-by-step from my viral video! Beginner-friendly tips, pro tools, and tricks that actually make curls last.